Installing a Questus Backstay Radar Mount and JRC Radar
After going through the various options for installing radar on my C320, I decided to take the plunge and try out the Questus backstay mount. The self-leveling feature of the antenna mount and the challenge of installing it myself tempted me.

By Ray Durand #822
Selecting the Radar and Mounting the Display
The selection of the radar was a much easier decision. I already had a Raytheon 425 chart plotter mounted on my pedestal. I had enough room on my existing NavPod enclosure for a small radar display. The available space eliminated anything from Raytheon, their displays are just too large for the space I had.
After doing some research and comparing specifications, I found that the JRC 1500 was rated as a best buy by Powerboat Reports magazine (October 2000) and would fit perfectly in the space available. The JRC interfaces with my Raytheon 425 chart plotter and ST4000 autopilot over an NMEA interface - it displays waypoints, speed, Lat/Long and other data on the radar's display. I found that compatibility with the rest of my Raytheon instruments wasn't a problem.

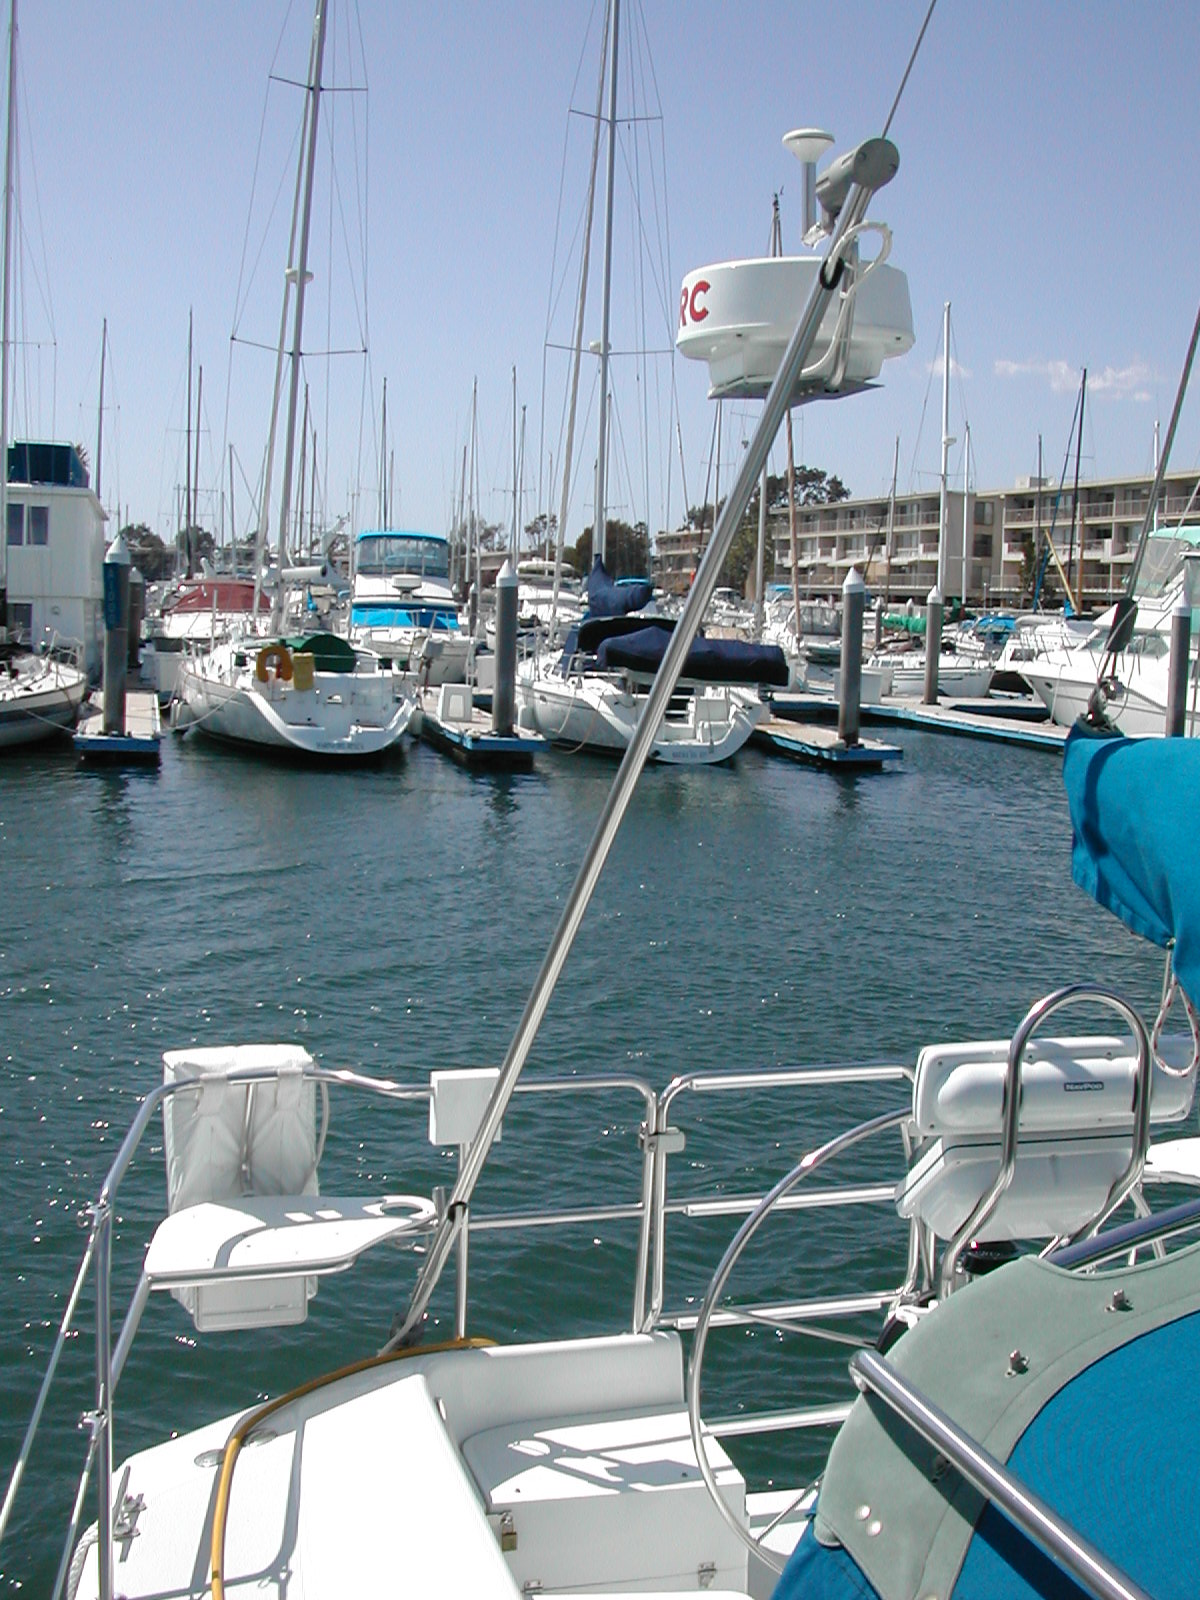
I bought both the radar and the Questus 400G backstay mount over the Internet.I first installed the display after moving my autopilot above to my new 4-position NavPod (I previously had a 3-position). After consulting with JRC, I cut the radar cable so that I could run it through the channel without the connector. I later spliced the cable back together when it was all done. I thought mounting the display would be the hardest part of the installation. It took some work to move my autopilot and run the radar cable down below, but installing the Questus mount turned out to be much more of a challenge.
Making the Questus Mount WorkThe Questus installation directions show how it can be used in six different configurations. The pole can be mounted fore or aft of the backstay, or you can run the backstay right through it. The antenna can be situated either fore or aft of the pole. I chose to run the backstay through the pole with the antenna in the aft position. This was the most appealing to me and frankly, the other pole configurations didn't seem possible with the way the hull curves on the C320 near the rear chainplate. I went ahead with the installation and followed the directions. I purchased a toggle at West Marine and I put the whole assemb ly together per the instructions. I thought I was done until I realized that the pole rotated too much around the backstay. It turned out that there was too much play in the connection between the "GramE">pole's mounting base and the chainplate. I tried using washers as shims to stabilize the connection, but this didn't work.
I called Questus directly and described my problem. They pretty much told me that this was a common problem and that I had to come up with a custom toggle to prevent the rotation. Nice - maybe they should mention this in their documentation? I was getting discouraged and had thoughts of returning the whole thing, but I decided to give it one more try and come up with the "custom toggle" that would fix the problem.
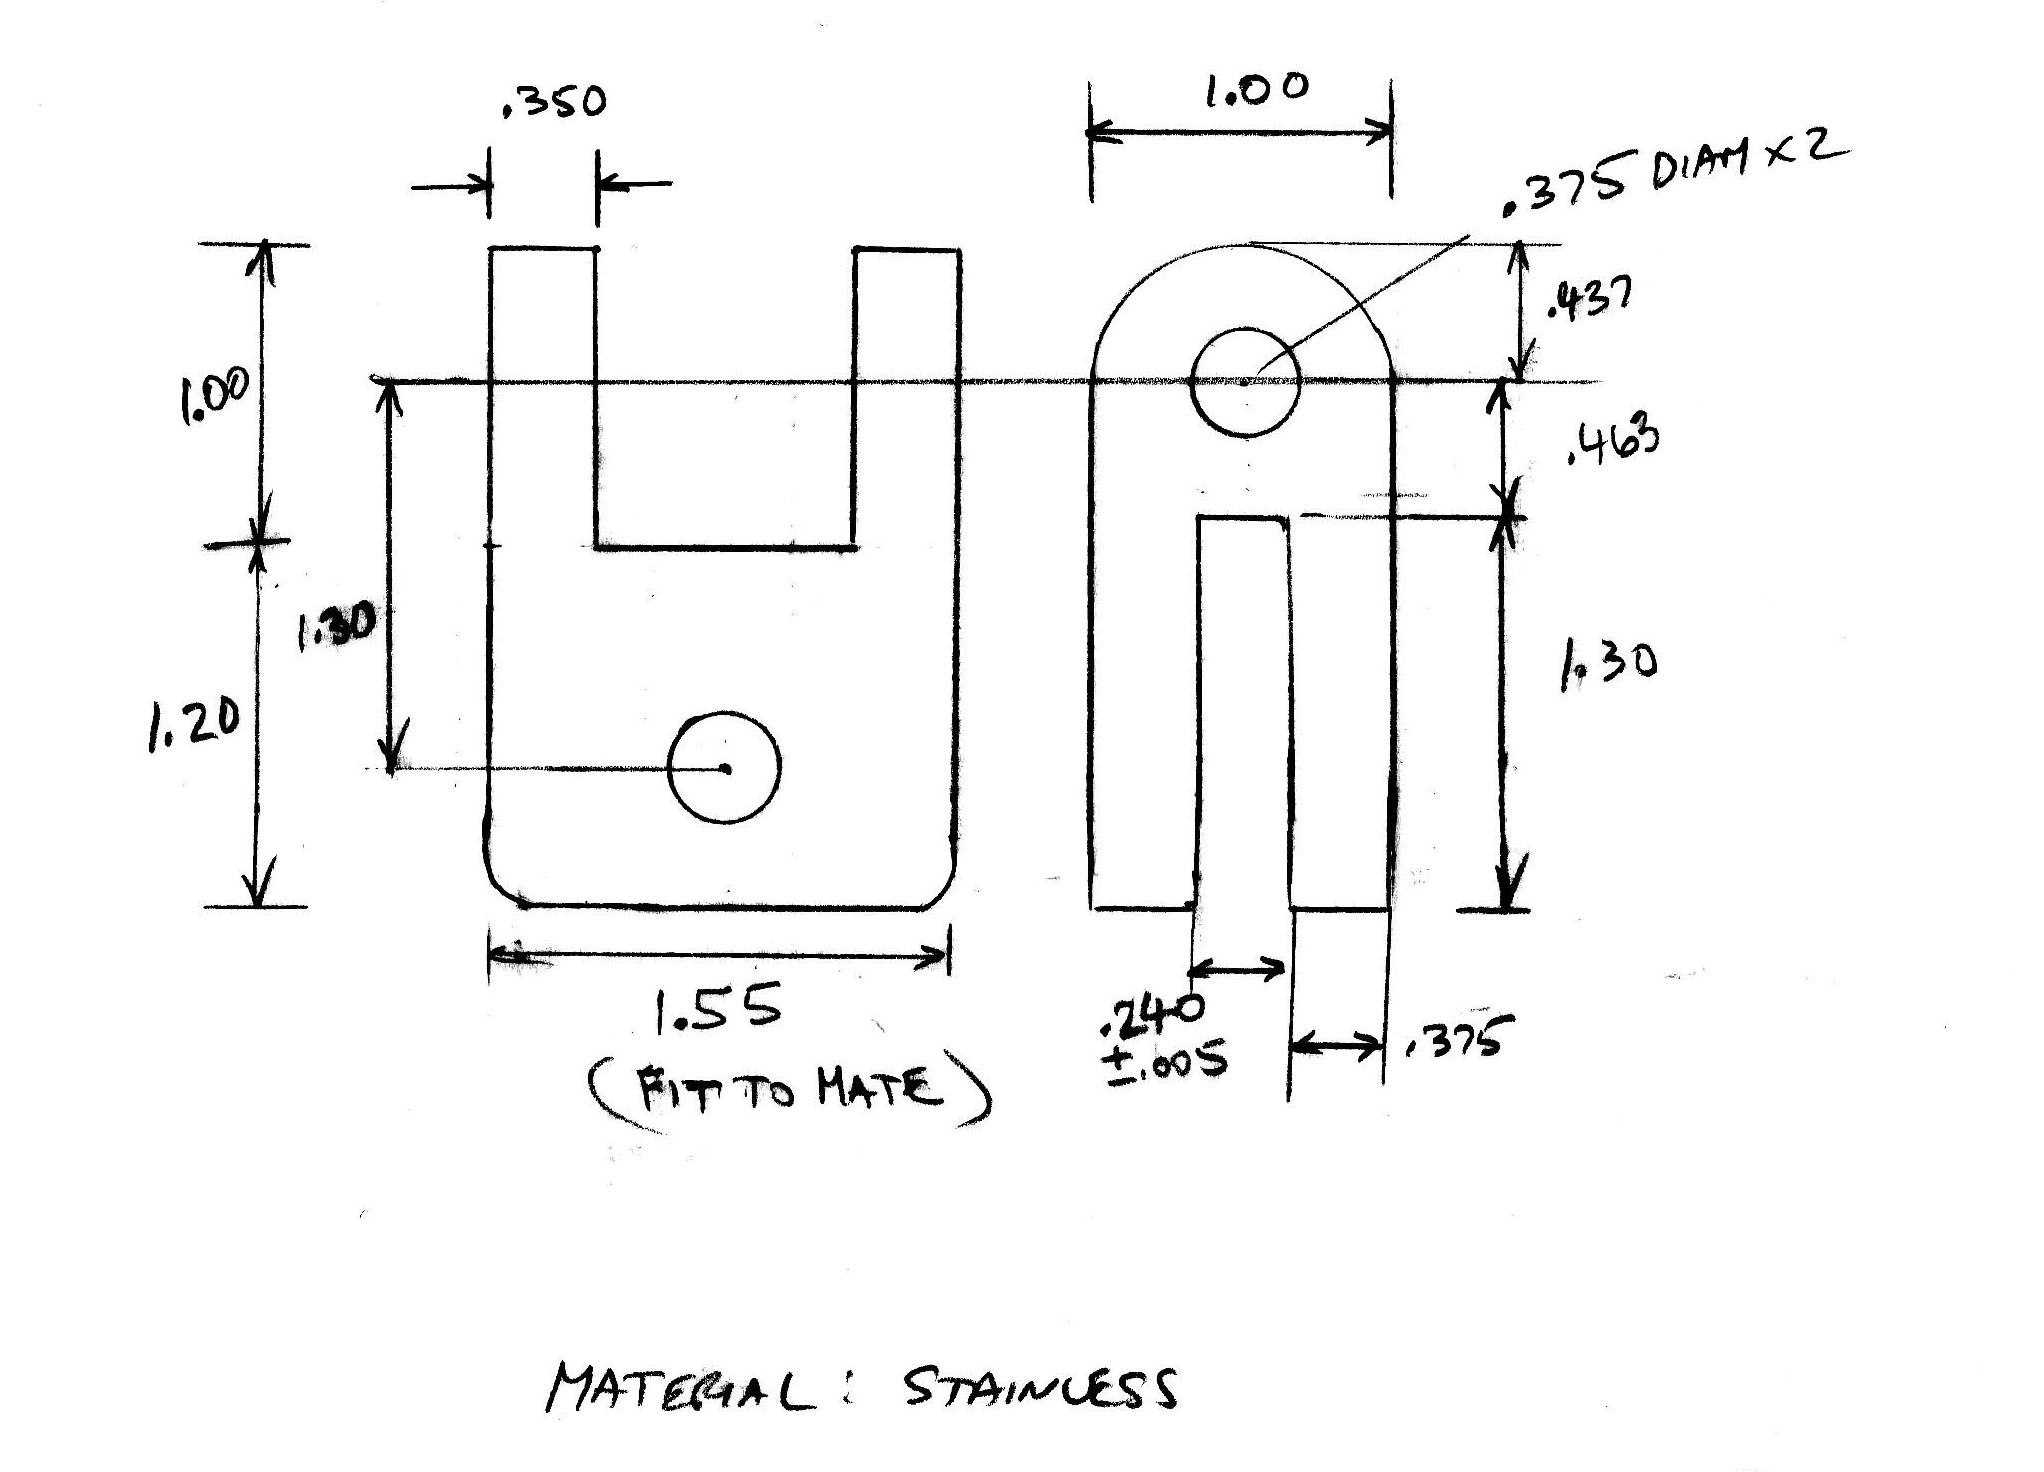
Custom ToggleBasically, the toggle had to very closely fit both the chainplate and the pole's mounting base without allowing rotation and without extending the overall length of the assembly beyond the absolute minimum. The toggle effectively lengthens the backstay by its length. I only had so much room in the backstay adjustment before I would have to shorten the backstay and I didn't want to get into that if at all possible.
I sketched out a design and decided to machine a prototype toggle out of Delrin - a hard plastic that could be easily machined. Having access to a milling machi ne at work, I went ahead and made the prototype that I later tried out on my boat. I discovered I needed a few minor dimension changes to make it just right, but it looked good enough to give me confidence to have a stainless steel version made by a real machinist.
After reviewing the design and prototype with my machinist, he convinced me that I not only needed to make a toggle, but also needed a better fitting clevis pin than the one provided by Questus with their mounting base. It cost me $250, a bit more than I wanted to spend, but after going this far it was too late to turn back. To make a long story a little shorter - it worked! No more rotation and the radar and mount works just great.
The following sketch is what I used to have the toggle made by my machinist. The dimensions worked for my C320 #822 - best to check these dimensions against your boat if you want to give it a try.


Running the Cables
One more thing I should mention is how I ran the cables without drilling holes in the hull. I originally had planned to drill a hole in the transom and use a clamshell connector to run the cables. After looking things over (and trying to build up enough courage to drill the hole), I took a closer look at the air vent mounted on the transom next to where I was contemplating drilling the hole. It turns out that the vent assembly includes a plastic circular extension to which the flexible air hose attaches on the inside of the transom. I loosened the clamp that secured the hose, slid it back, and discovered that the extension was a couple inches long - enough room to drill a couple of holes to run the radar cable and the GPS antenna cable through it and still have plenty of room to reattach the hose - voila!
Splicing the radar cable back together was the last challenge. The JRC cable consists of three larger wires (approx 16 AWG), a single mid size wire (approx 20 AWG), and four smaller wires (approx 26 AWG). I decided to crimp the larger wires and solder the smaller ones. Most of the wires had a shield wire associated with it. I tied all of the shields together and used a crimp to make the connection. For added security, I used an additional shield to cover all of the connections, a nd finished off with heat shrink and electrical tape.
Things to ConsiderI was a bit nervous about loosening and disconnecting the backstay, so I asked someone who knew what they were doing to help me out. It turned out that it's a fairly simple process. All that was required was to attach the main halyard to the stern cleat and apply tension with the winch. This took the pressure off of the backstay and I was able to easily remove the chainplate connections and proceed with my project.
As I mentioned earlier, adding the toggle increases the length of the backstay. Before you start, you need to exam how much adjustment is available in the turnbuckle. If there isn't enough adjustment left to make up the difference of the toggle's length, you'll have to get the backstay shortened. Fortunately, mine had enough slack in it. I marked the original settings using a black marking pen, and then referenced these marks when I tightened up the new assembly.
First ImpressionsIt's been a few months since I installed the radar and I have to say I'm very happy with both the radar and the antenna mount. The radar lets me see the small, close up watercraft that I was concerned about and the antenna mount is stable and does its job as advertised.