Repairing the Aqualift Muffler
The Aqualift muffler on Silver Lining recently developed a leak due to a crack in the underside of the base. Unfortunately, this appears to be a problem that has affected a large percentage of our owners, so there was an abundance of information on our discussion list to review. A C36 owner also assisted me as he had been through the same problem, although his cracks were in a different location (the exposed portion of the base as well as inside the mounting holes). I have also heard of cracks to the hose tube. After hearing bad reports about the quality of the Catalina factory repair, and not wanting to be without the use of the boat for 2-3 weeks, I decided to make the repairs myself.
Some owners experienced great difficulty in removing the muffler, mine went came out fairly smoothly. First, remove the four screws securing the muffler to the hull before you attempt to remove the hoses. This allows for the necessary movement as you twist and pull the hoses and takes the torque and stress off of the fiberglass tubes and the exhaust elbow. Carefully use a heat gun or hair dryer to soften the hose. Once the hoses were removed, I had to bend the transmission shift cable support bracket ever so slightly to provide clearance for the muffler box.
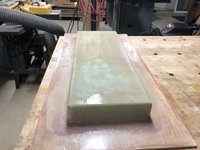
When I got the muffler home, I cleaned it and marked all the areas I thought might be leaking. I also found some voids under the gelcoat. I drained as much water from the muffler as possible and then blew the remainder out with an air compressor hooked up to the drain fitting, with the fiberglass inlet and outlet sealed off with duct tape. This is a good way to verify that you have found all the leaks, but be sure to keep the air pressure low (10psi). Some owners have actually filled the muffler with water and food coloring and pressurized as above, to find their leaks.
My epoxy of choice is West System but I have also heard of Marine-Tex being used for the repair. Surface prep is critical. I used a Dremel tool to open up the cracks and voids and to grind away the gelcoat. When all the prep was completed, I cleaned the area with acetone and blew it dry with compressed air. Make certain there is no residual moisture. I prepared the West System Parts A & B and wet-out the area of repair, using a toothpick to make sure the epoxy flowed into all cavities. I then thickened the remaining epoxy with adhesive filler and applied that. Where there was significant depth to the repair, I used small pieces of glass cloth. As a preventative measure, I drilled out the mounting holes, filled them with the thickened epoxy, and re-drilled when cured. Since my repaired areas will not be subject to UV exposure, I did not bother to apply paint or gelcoat. When everything is cured, you may want to do another pressure test, prior to re-installation.
The final step before re-installation was to attach a foam (or rubber could be used) gasket to the base to reduce the effects of vibration. I also used fender washers under the existing finishing washers to better distribute the load from the screw heads. Lastly, I replaced the short section of exhaust hose going between the elbow and the muffler. The existing hose was in fine shape but I thought that as long as I had it apart, I would replace it. My first choice was to use Blue Silicone Wet Exhaust hose, but I could not find it in the 2” size. As a result, I stuck with the rubber reinforced hose, although I toyed with the idea of using the non-reinforced version which might actually provide better vibration dampening.
(Thanks to Mike Gutshall, Alibi, #401 and Bill Schaffer, Bohemian II, #515 for contributing to this article.)
What's Related